Friday, February 28, 2014

Fear in the Studio

In the studio it is so important to be aware of your surroundings. Naturally, protective gear should be worn when operating all machinery. As a beginner student, it is perfectly normal to feel a certain amount of fear when working in the studio. Caution is strongly encouraged. But, fear can sometimes prevent us from progressing. I have found that the best way to get over that fear is to use whatever piece of equipment you are feeling nervous with. And, use it a lot.

After my casting accident, I was finding it difficult to come into the studio and work. Initially, I was jumping at every loud sound that came by. But, by spending time sitting in the studio and chatting to friends as they worked or by creating purely cold-worked (no flames/ solder/ etc...) pieces I was beginning to get back into the groove of the work. 

So, beneath I'm going to show the top 9 scariest pieces of equipment found in VCU's metals studio.

1) The Kiln
Kilns can give you pretty nasty burns but, as you can see, VCU provides gloves and we use tongs as well. 

2) The Drill Press
Somewhat scary. As long as you have safety glasses on, a dust mast and your hair pulled back from your face you should be fine using this. Just watch where you put those fingers!

3) The Rolling Mill
Just like the drill press, as long as you keep hair pulled back and your fingers out of the way you should be dandy. Watch out for loose articles of clothing as they may get sucked in. Always wear eye protection in the studio. 


4) The Pickle
Sodium bisulfate. Don't put your fingers in it. Wash your hands! 


5) The Torch
Handle with care. Make sure your gauges are working properly. Check for leaks with soapy water. Don't store it on it's side. Chain it to something (like a table). Don't drop it. 

6) The Belt Sander
I really don't use this too much. It's good for shaping wooden ring displays and steel rod for chasing tools. Keep your hair and loose clothing pulled back. Wear eye protection and a dust mask. Watch your fingers!

7) The Buffing Wheels
There are horror stories about these. Pull your hair back, wear eye protection and a dust mask. NO LOOSE ARTICLES OF CLOTHING. Do not try to polish chain. You will get pulled in and will experience a scene similar to those described when discussing the factory conditions of the industrial revolution. Ouch. 

8) The Centrifuge
Ok, this is actually not the worst piece of equipment we have at VCU metals. Look at that lid! It is so heavy and there's a latch that keeps the lid down. Obviously, I'm still a bit gun shy about this machine because the last time I used it it spat molten metal at me. What we could defer after the accident was that the flask I was assisting a fellow student in casting had not been burned out properly and there was still moisture in the investment. 

Casting is all about time management, numbers and preparation. As long as you maintain good notes and re-read them whilst following directions you will be fine. Yes, the lid makes a big boom. Eventually you will get over that and learn to love the rush. I currently feel like a beginner student again, which isn't a bad thing because I'm paying attention to all the little details now and it's made me a stronger caster for it. 

Wear protection. Glasses, respirator, gloves, even leather aprons are appropriate ways to protect yourself.

9) The Empty Sketchbook!
Blank. Full of promise and procrastination. Sometimes we have mental and creative blocks when working in the studio. The best way to push past this is to get busy. Draw down some wire. Place new limitations on yourself (like participating in a Radical Jewelry Makeover type project)!


If you've tried to get busy and still can't come up with anything, take your sketchbook for a walk. Go out with friends. Go to a museum. Remember, there is life outside of the studio and it helps to inform what we make inside it so try to make a little time to go experience it. 

On Monday, I'll be posting in-progress shots of the most recent piece I have made which was my "get out of this non-productive rut and make something" process. Have a great weekend!

Tuesday, February 25, 2014

The American Craft Council Show - Baltimore

No matter what career you are pursuing I guarantee there is a conference, show, exhibit, or lecture on it and I strongly urge you, dear reader, to seek out these opportunities as they are so incredibly valuable. You can learn more in a weekend at a conference than a whole semester of college. It can be a little overwhelming to have access to so many professionals in one spot but it is so worth the time, money and effort.

In the meantime, I hope that by sharing my experiences here I will be able to provide as much help as possible for those artists who are also transitioning from student to professional. 

Life Lessons Learned at ACC-Baltimore

1) Pricing. Do your research before pricing your work and be aware that your pricing might be different depending on the show you are in. The best advice I was given upon arrival came from Sayaka Suzuki, a fantastic artist and teacher in the glass department at Virginia Commonwealth University. She said, "Walk around the show, look for other artists displaying work similar to yours and observe their price points." I did this and discovered my work was priced painfully low. I had never displayed my work at an ACC show before but I knew other people who had and yet, due to time restraints, I failed to ask for their advice on my pricing. Don't be like me! Use all your available resources including other students. 

2) Business Cards. Bring twice as many business cards than you think you'll need. Don't underestimate your work. ACC- Baltimore saw thousands of people this weekend and I spoke to a few artists who had run out of business cards by midday Sunday. Try to avoid that situation. Better to go home with loads of cards (your own and others) than to miss networking opportunities. 

3) Appearance. You go to these events to meet people, widen your net of opportunity, and show your work to a large audience. You are promoting yourself because, as an artist, you are in fact part of the product package, (whether we like it or not). You're not just trying to show and sell your work but you're on display too. People always want to talk to the artist of the work being shown. Dress professionally but maintain your own quirky personality and flair. You want to still feel like you but in clothes you would never dream of wearing to the studio. 

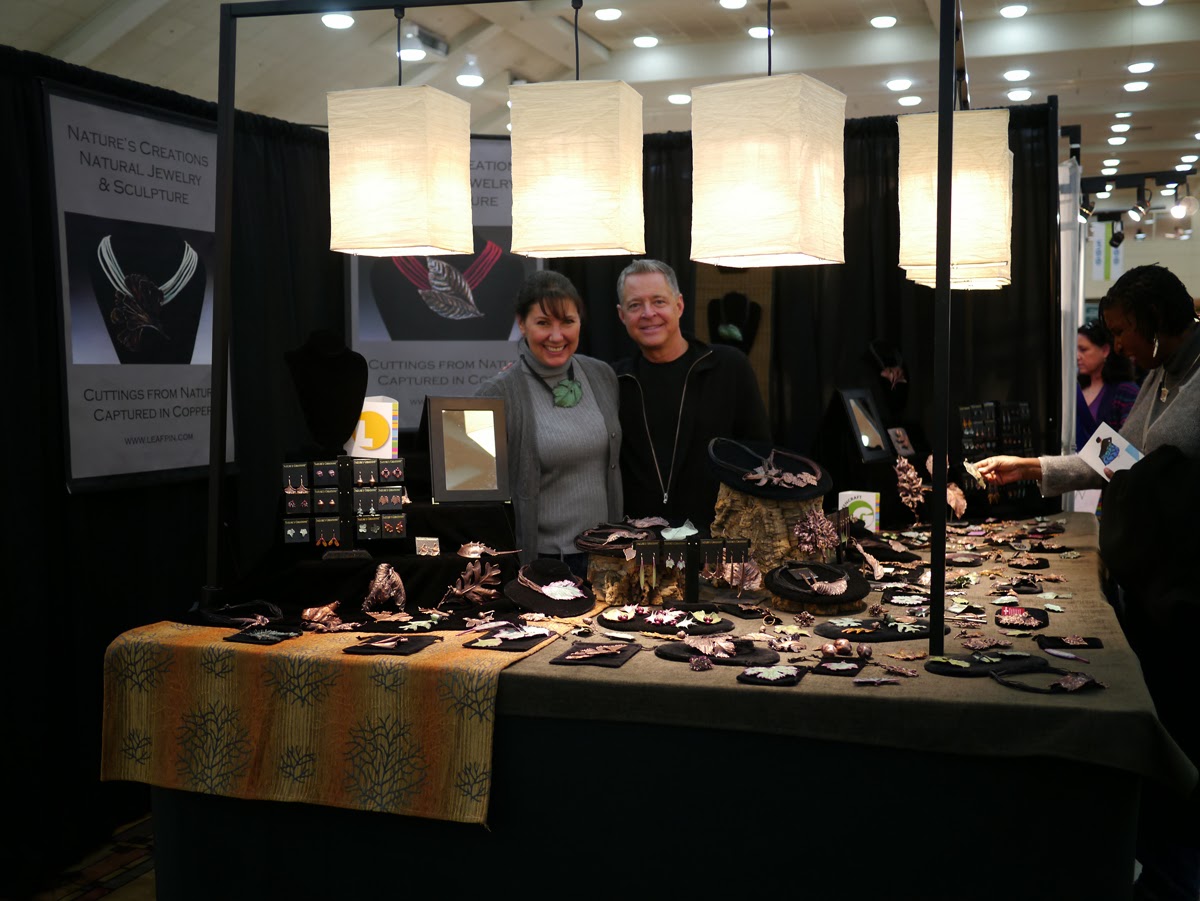
4) Display. There are so many creative ways to show your work. Some booths were set up like small galleries, some were set up like shops, and some were shared by two artists which displayed their work together or had split the designated space. Below is a sampling of the booths at ACC- Baltimore. Make sure to check out the artists websites!

What I thought was great about Dennis' display is that he had lots of pieces scattered over his tabletop much like real leaves would cover a surface. His corner booth felt open and inviting too. 

Julie's booth struck a nice balance between on display and in the display case. It felt very professional and as you can see she had large banners attracting customers from a distance. I noticed that quite a few jewelers were employing this tactic and it did seem to draw in more customers. 

Kyle's booth had these great shelves which were just the right size for the work he was displaying. Because of the white walls and the decent lighting the booth felt very much like a small gallery space. Kyle was also full of awesome pricing tips (as was his wife who told me if she can afford my work I'm not charging enough)!

I was lucky enough to get to booth sit a little for Shelly. As you can see she has two types of display cases. She told me she's going to transition so that she's only using the plexi case (on right) as it is much lighter than the wood and glass case (on left). I also think it makes the space feel more open. She only keeps a few necklaces, bracelets and pins outside of the cases. She makes these fantastic olive and acorn pins which she leaves out on a display plate but she's found if she leaves more than three out they tend to walk off. 

I absolutely love the way Becky and Steve showcase their work. I've seen a couple instances at previous shows where artists have priced their work appropriately but because of their booth's slapdash appearance no one wants to pay up. If you display your work like you believe in it's worth people will pay the asking price, which is exactly what Becky and Steve have done. The color is great for displaying black and white work and I love the backlighting on their pottery. The small nook in the back left corner is also a nice touch because it allows for a booth sitter/ the artist to maintain a watchful eye without obscuring the customers view of the work. 


And here we are! VCU's fantastic booth that was designed and put together by the Handcrafted Entrepreneurship class led by Sayaka. Sunday shift workers from left to right : Ginny Rush, Lora Price, Me (I wasn't working though) and Sayaka Suzuki. I think the Handcrafted Entrepreneurship class did a really lovely job. The booth feels open, warm and inviting. 

5) Stay close and visit for the whole weekend. If you're traveling to the Inner Harbour in Baltimore I highly recommend the Day's Inn. My finance and I were both unlucky enough to have lived through two separate bed bug infestations and the Day's Inn was one of the few hotels without any reports of the wretched things. It was also very clean, beautifully designed, convenient (only a block away from the convention centre, validated parking and free wifi) and had a great little restaurant downstairs. 


The best part about going to these types of events is that it really gets you motivated. You leave and your whole body is tingling with excitement about getting back into the studio, which is where I'm headed now.  


Wednesday, February 19, 2014

Rings: From 2D to 3D

Here's a few sketches and studies. Sometimes my ideas start on paper and other times they're informed by the materials I'm playing with. These rings came from a kiln working class I was taking. Even though they're not exactly "portfolio pieces," I enjoy them and think they're a great jumping off point for future projects.


Materials: Sterling silver, moss, glass beads, enamel


Materials: Copper, enamel, glass beads, moss, kiln-fired glass


Jewellery

Jewellery has been a long-time passion of mine and I am fortunate to be attending VCU, which is not only notable for it's Communication Arts department but also it's Craft/ Material Studies program.

I will be graduating this May with dual degrees because of this.

By throwing myself into my second degree, I have emerged with an incredible passion for metalsmithing and adornment. Needless to say, my path is shifting from botanical illustration to jewelry, however, both forms of art inform the other and I do still maintain a botanical illustration practice.

I was recently nominated to compete for the prestigious Windgate Fellowship. This is an absolute honor and I am so proud to be representing my school. I am so fortunate to have found such a wonderful mentor as Susie Ganch. I certainly hope to be a mentor myself in the future.

I will be posting regular updates of my studio practice and creative process so please stay tuned. Feel free to visit my website and ask any questions via my contact form. I've listed some great links there too.

Here's a look at the work I have been making.

Requiescence
Photo Credit: Courtney Taylor Bowles

Detail
Photo Credit: Courtney Taylor Bowles

Kindred
Photo Credit: Jane Barton (Dautant)


Sieze
Photo Credit: Courtney Taylor Bowles

Cameo
Photo Credit: Courtney Taylor Bowles

Collar
Photo Credit: Courtney Taylor Bowles

Encounter
Photo Credit: Jane Barton (Dautant)

Germinate
Photo Credit: Courtney Taylor Bowles 
Succulent
Photo Credit: Jane Barton (Dautant)

Us
Photo Credit:
Jane Barton (Dautant)